There are patterns and principles, long since tested, that can make anyone more effective in whatever kitchen space they find themselves in. This post is a collection of rules you should know as well as the best shortcuts and re-purposed items I’ve found that have made a difference in the way I’m able to effectively work in my kitchen.
These ideas, while they’ll do tremendous things for the way you feel about your kitchen today, are also something I’ve come to appreciate as an added layer to my food preparedness too. Not only does an organized kitchen make you want to cook more, (encouraging you to get better at the skills themselves) but in an extreme circumstance, it’s benefits could even include a much faster and smoother transition if relocation to a new space was necessary. There are lots of reasons to put thought into both your kitchen space as well as the tools/ ingredients you use most to find the path of “least work” for the “greatest return”.
**
The best part to me, however, is that these principles I’m about to share with you are constant. What works efficiently today isn’t going to change tomorrow. It just works! By gaining this understanding we can create a space that practically does the work for us. Not only that, but with these “constants” in mind it becomes easy to survey a kitchen space — no matter where you are or how long you’ve lived there — and determine the specific function you need from it.
However, before getting started, we should begin with “why” we should consider organization in the first place.
The way I see it, life itself isn’t slowing down any time soon. If we’re to learn how to cook from what we store — meaning “from scratch” — in the fast paced lives we live, we have to create for ourselves a convenient place to learn. If it takes 10 minutes to gather ingredients and equipment to simply try a recipe (and you have hungry kids asking “when’s dinner going to be ready?”), frustration will set in before you even begin.
Unknowingly, if you’re not getting around to trying things, it could possibly have nothing to do with the cooking itself, but more to do with a lack of organization.
Help & Instruction
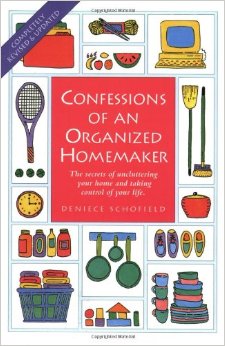
There’s a wonderful book I found that opened my eyes to many of the ideas you’ll see here. The book is “Confessions of an Organized Homemaker” by Deniece Schofield.
In it, the author writes about the inspiration and direction she found from Fredrick Winslow Taylor (1856-1915), the first efficiency expert of our age. Taylor, who was well known in his time, believed everything had “one best way” of getting done most efficiently. He would experiment to break down jobs into their smallest component tasks, experiment to determine the best way to accomplish them and how fast they can be performed, and then find the right workers to do them. It was called scientific management, or “Taylorism” — a formula to maximize the productivity of industrial workers. Bringing these shortcuts to the kitchen, Deniece then used Taylor’s recommendations to maximize efficiency there. She came up with the following common sense “rules” for organizing a kitchen for best use.
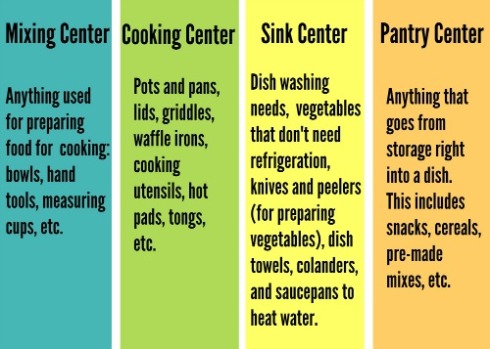
Determine Work Centers
Everyone basically does the same things in a kitchen. We prepare food to cook, we cook it, we clean up after our cooking and we eat what we’ve made. Deniece’s idea for creating “centers” helps to give a best place for the things you use there. Rather than keeping a sink area item you use all the time five steps away near the stove, wasting unnecessary time and energy to retrieve and put it away, this helps pre-determine what needs to go where in your kitchen.
With this as a starting point, let me show you how this idea helped transform the way I utilize my own space.
My Real Life Kitchen
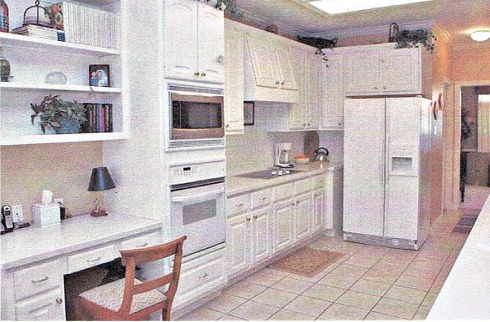
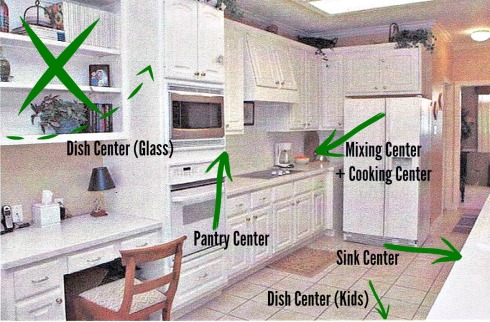
Before showing you what my kitchen looks like now, I have a picture here of my neighbor’s kitchen –who happens to have the exact same layout– so you can see the space I started with. As far as cupboards and counter space go, the amount of actual work area is pretty limiting for someone who cooks as much as I do. So for those others of you who out there who have lots to organize yet a small space to work with, I’m there with you! Every inch of counter space and every cupboard and drawer in my kitchen is like gold!
In deciding where to put my “centers”, I realized I had no choice but to combine both the mixing & cooking centers in one. This is because my back corner cupboard (next to the refrigerator) is the only continuous area with cupboards and counter space for all I need in cooking and mixing without having to stretch over to another area in the kitchen.
Here’s what my ideas for the kitchen became next:
Prioritizing The Items You Use
After you have a basic idea of where you’re going to base your cooking/ mixing/ sink & pantry operations, the next decision you have to make is which items get priority for the space you have. Once again, Denise developed a great system for this detailed in her book which she based on Fredrick Taylor’s “Time and Motion” studies of the 1800’s.
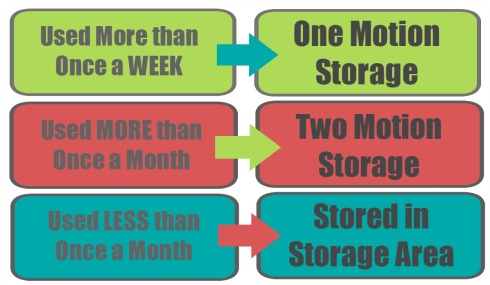
By studying the way certain people get more done in less time, Taylor discovered one of the biggest efficiency keys was the number of motions (arm motions, or even having to walk to get something) it took to retrieve what was needed and put it away again. With this as a base, Denise came up with this rule of thumb:
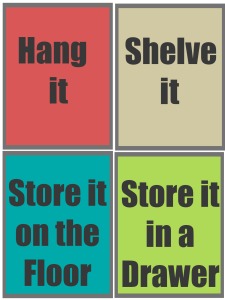
Coupled with this, is the reminder of all the options you DO have in a space. Sometimes it’s easy to look at an area and overlook what you have to work with. Again, in her book Denise outlined this helpful reminder of the 4 options you always have in organizing any space. None of them are better than another, they just require a little different way of looking at things. When organizing, you can:
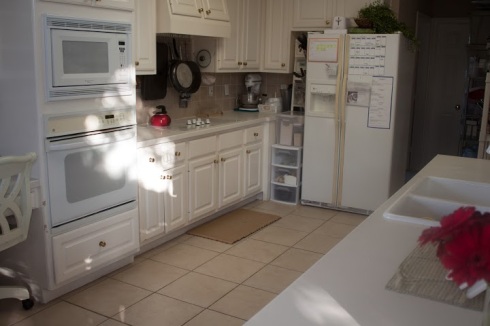
With these two main principles understood, I was ready to make my space really work for me. For my critical cooking/mixing corner it required heavily utilizing hanging space as well as moving my refrigerator over to make room for more storage. Here’s the overall picture of what my kitchen looks like now:
It’s funny to recognize the tendency we all have in underestimating both the amount of space certain things require and the amount of time things take to do. It’s built into us, part of human error, but the fact is everything requires space! No matter what space you have to work with you’re in charge of taking control of it. Just because a space is intended to be a certain way doesn’t mean it has to stay that way. Make it work for you!
For me, moving the refrigerator turned out to be the best move (pun intended) I’ve ever made! Even though it now extends into the hallway by about a foot, I wouldn’t trade it for anything for how functional the corner space is that I use all the time! The best part is that everything I cook with is exactly where I USE it and I know by doing this I’ve saved myself tremendously from having to walk back and forth to grab and put things away.
The Tricks That Made it Work
For the next portion of the post, I’d like to share the best organizing gear, as well as re-purposed items and tips I’ve found in making kitchens perform magnificently well. Let’s go through my list of favorite items and then we’ll take the royal tour to see how I’ve used these things in my own kitchen.
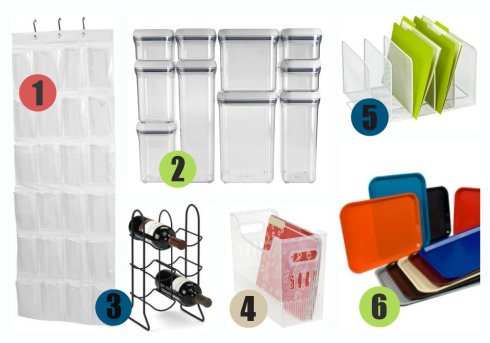
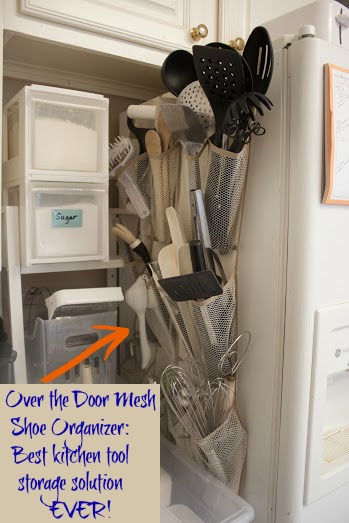
1. Over the Door Shoe Organizer
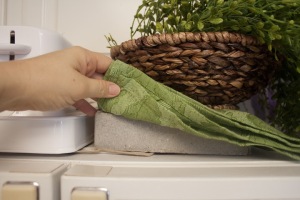
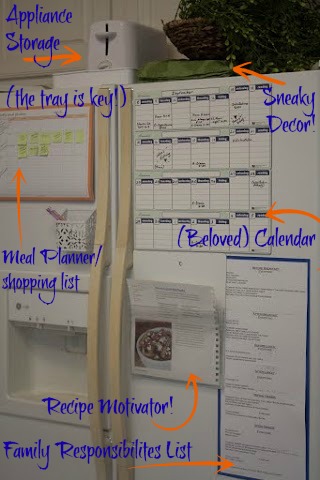
In the kitchen I use a mesh variety rather than plastic to store my cooking utensils (just in case I have some put away that are still wet). I have one hung to the side of my refrigerator that’s secured at the top of the refrigerator with a heavy tile and covered with a pretty plant. (Ah hah, I’m so sneaky!) I love this solution for how many tools I’m able to fit in it. It works awesome and no one is the wiser!
2. Square Clear Airtight Containers for All Cooking/ Pantry Cupboard Food Items
While I decided to invest in a number of airtight food canisters (I went with OXO containers), any square food grade container will work. The thing I love about it: food gets USED more often because ingredients are easily seen. The visual “noise” of all those brands and grocery store containers is gone. When I look in my cupboards I see ingredients — I can see what I have to cook with — not varying shapes and colors of package boxes. Secondly, everything (thanks to the similar square shapes) fits together perfectly in my cupboards like puzzle pieces. The space is utilized so much more effectively and it’s a cinch to clean/ wipe out the cupboard and return it all back again. Also, if for whatever reason I had to pack up the contents of my cupboards, it would be the easiest thing to do as they’d all fit neatly in a box.
3. Wine Rack
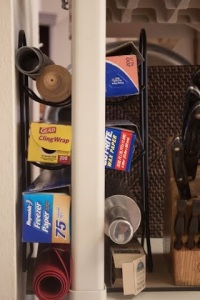
Set on a shelf, I love using a wine rack (like this one) for my wraps and foil as well as rolling pins and other things.
4. Multi-Purpose Bins
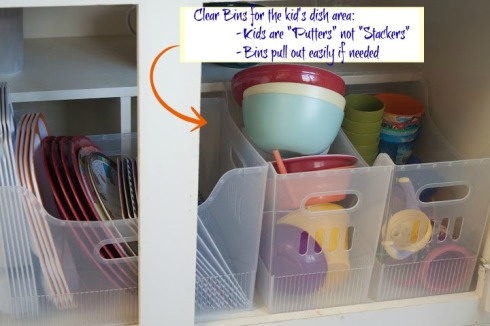
These bins are one of my all time favorite items for organizing anything all throughout the house (you can find them here). In the kitchen I use them to organize all my Tupperware, boxed food items (like the pasta I buy from the store), many of the pots and pans I use (under the stove) and kid’s dishes. They’re easy to pull out while (most importantly) keeping everything contained. I’ve found it’s been more successful to have bins to “put” things into than trying to keep things neatly stacked (which never happens).
5. Letter sorters
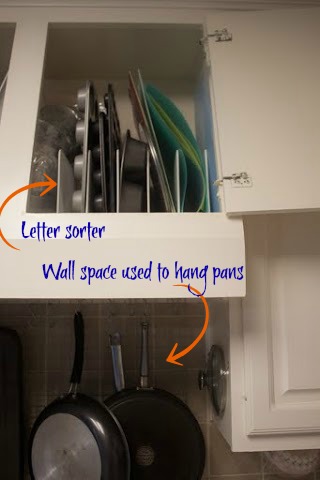
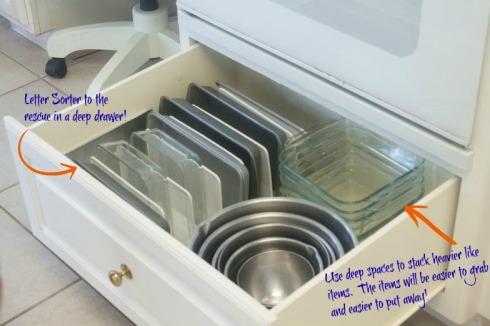
Ahhhh…. I don’t think I could make it without these in my kitchen. Originally intended for secretaries and office organization, letter sorters (like these that I bought here) are amazing for organizing kitchen spaces. I use them to organize everything from cookbooks (only five at a time are kept in the kitchen, all others are relegated to a bookcase elsewhere) to cutting boards to baking trays, to muffin pans. They also work great for deep drawers. I’ll show you my utility shelf where I’m able to fit the biggest portion of my trays and baking pans later on in the post.
6. Plastic Trays Underneath All Appliances
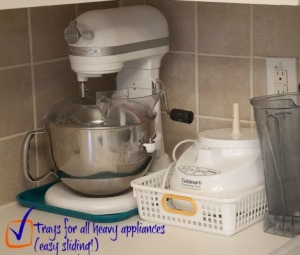
This trick makes things so much easier yet it’s so simple. Keep a tray under all the appliances you use all the time! Appliances on the counter, though heavy, will easily slide where you need them and appliances kept elsewhere are more easily handled when you’re ready to grab it. I used to hate lugging my heavy Kitchenaid over to where I was working, however, with a tray underneath it moving it is nothing; plus the mess is contained if something spills. As far as appliances stored “off the counter”: we keep our toaster on top of the fridge because counter space is so limited, so having a tray with the toaster keeps the crumbs contained (less mess) and makes it easier to take down when needed. (P.S. – Though not available for purchase online, I found these trays for under $10 at Target. They’re just the right size for my toaster and Vitamix.)
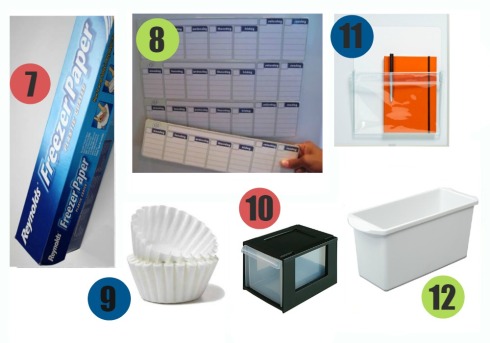
7. Freezer Paper
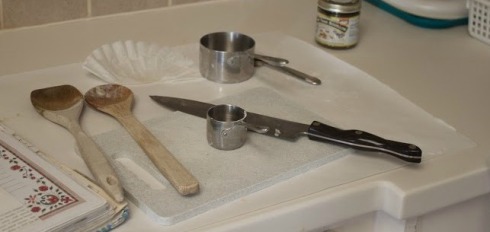
A sheet of Freezer paper on the counter top is great for easy clean up when I know I’m going to be cooking a lot.
8. My Favorite Magnetic Calendar
A small item that makes my life easier and happens to belong in the kitchen: I love this magnetic calendar to keep track of everyone’s schedules. It’s the only one I’ve found that’s magnetic and where the individual weeks are separate, so it’s always up to date and I never have to re-write the previous weeks. If you like it, you can find it here.
9. Coffee filters
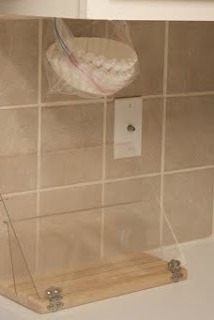
Going along with the freezer paper idea, coffee filters make a great disposable spoon rest to keep messes off the counter. Most of the time I just use the coffee filter in fact (unless I’m really going to be cooking a lot, in which case the freezer paper comes out). I use them so much that I have a simple holder for them (made from a ziploc bag) right above the counter where I use them.
My “so silly but it works” ziploc bag holder for coffee filters, along with another thing I always have on the counter, my cookbook holder.
10. CD Drawers
The idea on this, because honestly I don’t know if you can find this exact holder anymore, is to look around and find items perhaps used for other things and see if they’ll work well for what you need. These ones were made by Iris but unfortunately aren’t anywhere to be found. (You can see details about them here on Amazon if you want to search around.) The point is, for years they’ve been my favorite container for holding flour and sugar even though that was never their intended use. Both flour and sugar are things I’m always running through quickly and I love that I can pull out the drawers whenever I need them and put them right back. Plus I love that they stack and the size is just perfect to hold either a bag of flour or sugar. Keep your eyes open for containers that might do the job better but aren’t necessarily geared for the kitchen.
11. Magnetic Clear Pouch
I don’t know about you, but if something is covered up, put into a drawer, etc. I usually forget about it. This magnetic pouch (find it here if you like it) is what I use to “remember” the recipes I want to try out. I’m probably a bit more unconventional about it than many of you, but for me I either keep a recipe or I throw it away. If I decide to “keep” a recipe it goes right into one of our family’s cookbooks (video #2 shows you our family’s food storage cookbook, our family’s regular cookbook is simply a book where I keep copies and favorite recipes from cookbooks, etc.). Otherwise it gets thrown away.
My system for “encouraging” myself to get recipes tried out, stems from this magnetic pouch. If I see a recipe I like, I copy it or pull the whole page out of the cookbook and date it for 10 days later. If I haven’t made it after 10 days then it goes into the garbage. Since I don’t want to possibly throw away a good recipe, it gets tried! The clear pouch keeps it in sight so I don’t forget that it’s there.
12. Ice Cube Bins
I love using these bins both on the shelf as well as in my refrigerator for storage. Here’s the idea (which applies to lots of other containers as well): it’s much better to utilize “back” storage space within a container, such as this bin, rather than have odd items pushed back into the backs of shelves/ the refrigerator, etc. You just pull the whole bin out if you need anything and put the whole bin back. Ice cube bins in particular are an excellent and affordable way to do this! For under $5 you have a container that fits most shelve “depths” yet takes up very little shelf “width”. In my pantry center, here’s how it all comes together with the ice cube bin idea and clear (square) canisters for food.
And two more ideas (which I forgot to add into the above…)
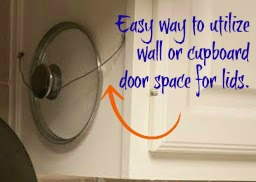
13. Hanging Lids
I love this idea. It’s so simple and cheap to do. A simple metal wire (twisted around a screw) can do wonderful things for allowing your most used lids to be kept right in the right place for when you need them. Not only do I have two lids hung this way as you see it here, I also have three bottom cupboard doors where lids are hung inside the door as well.
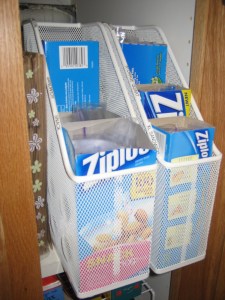
14. Magazine Holders
Last but not least, I didn’t want to forget magazine holders…
If you have an area that’s handy for them, magazine holders make great holders for ziploc bags. This was something I loved in our last home, which unfortunately doesn’t work with this one. It made it so easy to just grab the right sized bag I needed and the boxes fit perfectly.
This and that
So back to my centers. For anyone who’s interested (or whoever’s still reading), here is the interior and all the workings of my mixing/ cooking center. First off, here’s my main cupboard, the one I’m constantly pulling from as I’m cooking and baking.
One thing I love about having the containers is that when I refill things I can mark down on one of my lists as to how long it’s taken me to get through a certain item. Last month, for example, I over-bought (or rather over-stored in the cupboard) on dates, thinking they’d get used more often than they did. Now, because I know this, when I buy them again it’ll be easier to know how much we really use week to week and how much I’d need to vacuum pack away for later. This is all giving me a sense for portion packaging and helps in the long term so that (hopefully) when we have to eat exclusively from our storage, things are packaged the way they need to be so they’ll last and not go to waste.
Also, a big rule here {in this most privileged cupboard}, is that the items stored here have to be actively used. I keep track of when I use them throughout a month’s time. If something isn’t USED, it loses it’s spot for another ingredient. No loitering allowed. My list keeping track of which ingredients I’ve used helps a lot to encourage me to get going on using the ingredients that have been left idle for too long. “What do you mean I haven’t used millet for 3 weeks? I need to use that!” And so it goes…
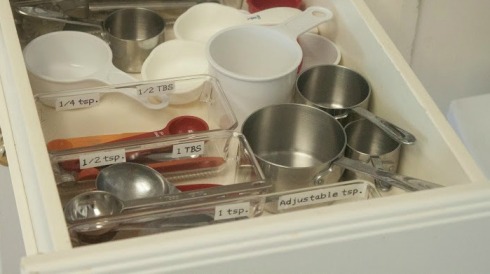
Just beneath the cooking/mixing cupboard, I have the one lonesome drawer that has the best location for use. While it’s easy to over pack a prime space like this, less is more, as far as the ease of grabbing something when you need it. Measuring spoons and dry measuring cups are all there is here. One reason is that I’ve found that nesting the measuring cups — especially when kids are putting dishes away — never happens. These items have to be given space in the drawer to spread out.
Also, I keep different measuring spoons in different containers, different enough in size that it’s easy to know which one I need to grab but yet so I can still keep two sizes in each container.
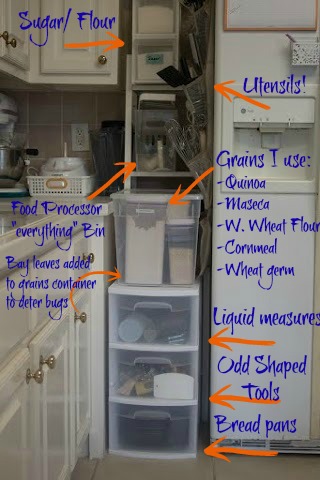
Next, to the side of the fridge, you can see how I’ve really packed in the storage space. Currently, I’m testing keeping my most used flours and grains opened at room temperature (as opposed to keeping most of them in the freezer like I’ve done in the past) to see if bay leaves in the container can effectively keep bugs away. My thought is that since most of these items (for me) are already stored in larger quantities, I need to practice and figure out how to keep them good without the freezer since I’ll possibly be needing to do it anyway if the cans are opened and waiting to be used and there isn’t any power. So far, so good!
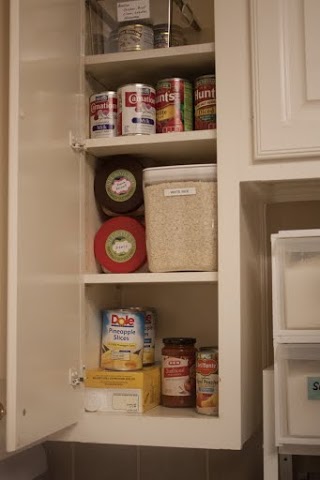
Here’s the cupboard right in the corner of my cooking/ mixing center. The bottom shelf is exclusively for items I gather from our storage pantry which are tagged for meals I have planned on the menu for the week. Also any items from the grocery store that are going toward a meal (the kids know to keep away from this shelf). The next shelf up is exclusively for rice varieties and the next up from that holds the two items from our storage that I use most frequently: canned milk and diced tomatoes.
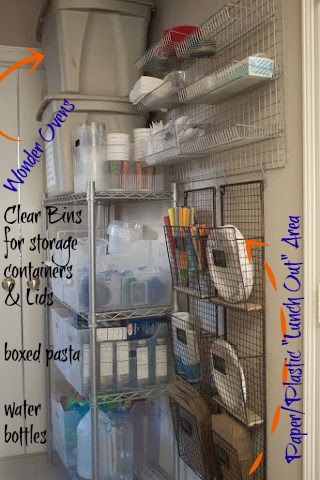
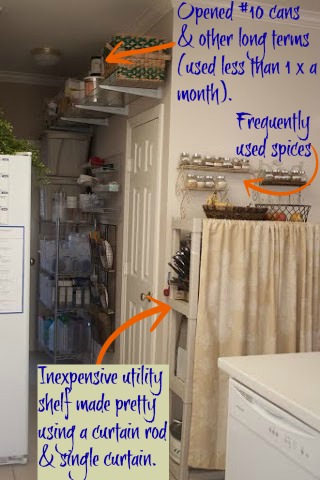
I have people ask me all the time where I keep my Wonder Ovens in the kitchen. Along with them, here in the hallway to the side of the kitchen I have a bunch of things I use but don’t require having to be right in the kitchen. As you can see, I’ve had to get creative using wall space. No matter, it still works. It’s better to have things handy rather than pushed back to the back of a cupboard. Our “lunch out” area is for anything we need if we’re taking food out with us, whether it be lunches, a picnic, whatever.
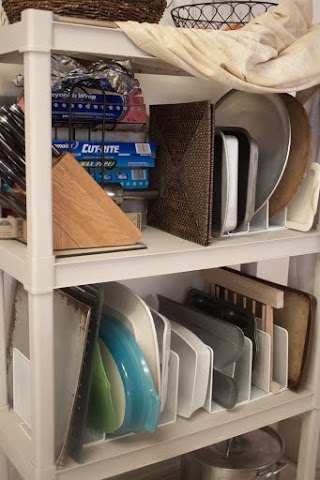
Like I mentioned before, I love letter sorters. I’ve used them to their fullest here in this utility shelf. I simply didn’t have room for my bake ware and trays in the kitchen itself and these are items that are easy to grab and usually are needed at the end of preparation anyway.
I love these things! I can fit all kinds of everything here and it all works! Anything from my pasta drying rack to pizza pans to my odd shaped double french bread pan (from this recipe).
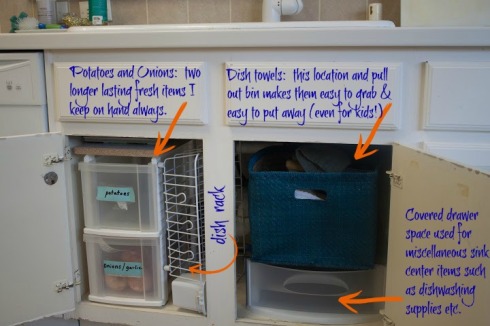
Last, but not least, don’t forget to think it through in the sink center. The smartest place for my potatoes and onions — fresh items I always keep on hand and count toward my 3 month “eat as you’d usually eat” storage — turned out to be under my sink where I always stand to wash them.
Another thing I love here, that used to drive me crazy in other places: a big bin or basket for dish towels! The kids, after they’re done folding, just put them into it and it’s left nice and neat. In a drawer (of course the drawer wasn’t big enough, that was probably the main problem) we had way too many towels for the space and it was a mess.
Now, instead of towels in the drawer to the right of the sink, I have my Ziploc bags, veggie peeler and serving pieces (like the pizza cutter, salad tongs, serving spoons, etc.). All of the serving pieces are marked with a yellow piece of electrical tape on their handle so my kids know which pieces belong in that drawer versus which ones belong on the side of the fridge when they put them away.
And that’s it! You can now say you’ve seen nearly every inch of my kitchen. Now go take a look at your own…by taking note of the function you want each area to have and the priority for each tool and ingredient in your most used areas, you can save yourself vast amounts of time and energy and get on to the fun part…cooking!
If you’ve enjoyed this post and would like to see where I store my long term food storage throughout my house as well as in my walk in pantry, you can visit this post.








I didn’t realize this was from you, so I decided you should see this great post and blog. As I was looking for your email address I noticed the person name was Megan, so I looked at the picture… Surprise it is you. I looked at everything you posted and thought it so great, I wanted you to see it…. Silly me.
Sent from my iPad Susie jspierce1@att.net
>
Too funny! Thanks Susie!
Did you know storing onions garlic (raw) near potatoes (raw) causes them to ripen and sprout more quickly? Same with fruit. Onion in my kitchen get a dark cool corner away from the rest! Yes, extra steps.
Inside the refrigerator I also have a lunch bin–for ease of making sandwiches in the morning before school.
Love how useful your centers are! I have two of some utensils because they have two places of use– and I have two ginger powder, salt, honey containers for same reason. Baking ctr and cooking ctr. Great post.
Thanks for your tip, no I didn’t know that! I wonder if I moved the onions into the drawer beneath the dish towels if that would be enough space away from the potatoes? Thank you for sharing that!
Great ideas…I have a very small kitchen with no storage to speak of, in an early 60’s home that has no storage in general so I’ll be implementing some changes to improve functionality–thanks! One question though–a lot of people put their trash can under the sink to keep it out of sight, I know we do. We also have a 13 gal trash can for recyclables in the kitchen. Where do you have your trash can/recycle bins? I really love the idea of utilizing that space the way you have instead.
Thanks! We have our trash can off to the left of the dishwasher mostly because we’re trying to train our kids and it’s kept there because it’s easier for them to be able to notice it needs taking out and be able to lift out the bag. That said, I wish I had another option myself. The trash gets taken out at least once if not twice a day here, so if anything it’s an eyesore, that’s all. As far as recycling goes, we keep that outside. Let me know if you discover a better solution!
Wow! That’s all I can say…..except you can come organize my kitchen anytime!
It’s been a process. Hopefully what’s worked for me can provide short cuts for others. Having it well organized has made a huge difference in making everything easier for me.